
Github源码请移步本文底部。
模型导出pb文件
首先我们需要在我们的python代码中保存训练好的模型,save_path参数就传递**.pb,这里导出文件留给接下来使用
1 | def save_model_and_params(session, save_path): |
Android中通过JNI调用
Tensorflow与Android整合
整合部分就直接按照Android端运行Tensorflow中的步骤来就行了。
封装输出数据解析逻辑
在手写数字识别模型中的输出是一个size为10的列表,列表元素的索引值对应输出的结果,列表元素对应输出的概率,例如输出是[0.2, 0.7, 0.01……],即表示有0.2的概率是0,0.7的概率是1,0.01的概率是2……
因此我们需要在输出中对数据按照概率进行降序排列,以便让结果一目了然。
1 | /** |
这时我们就能通过MnistData类的top方法得到概率最大的几个结果分别是什么。
构建数字分类器
这里通过TensorFlowInferenceInterface来调用模型,注释写得很清楚,值得注意的一点是,input和output的名称要和模型中的变量名称保持一致。
1 | /** |
添加画板
模型处理的逻辑已经写完了,接下来就是如何得到输入源了。由于是手写数字识别,所以接下来就要写画板类。这里只贴出关键代码部分(完整代码可以看本文底部的Github地址)。
手指滑动屏幕时画出手指滑动的轨迹
1 |
|
向外部提供读取画布数据的方法
1 | public float[] fetchData(int width, int height) { |
运行测试
布局代码就直接省略了,我们只需要在点击识别的时候,调用下面这段的识别逻辑即可。
1 | // 识别 |
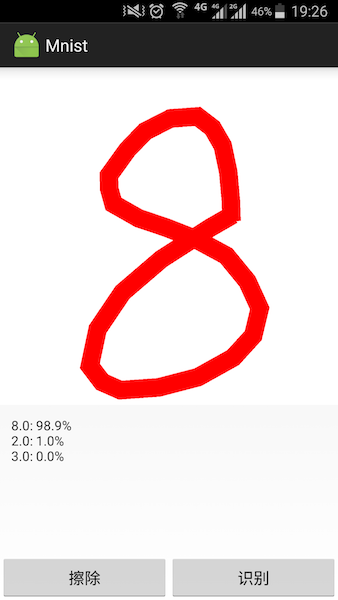
最后附上运行效果图
这里是该项目的Github源码